
Tesla-biler er kjent for sin banebrytende teknologi, minimalistiske design og innovative elektriske drivlinjer. Eiere av Tesla Model 3 og Tesla Model Y nyter en kjøreopplevelse som føles langt mer avansert enn de fleste tradisjonelle biler.
Men en liten detalj overrasker ofte nye Tesla-eiere: det fremre bagasjerommet (frunk) krever forsiktig manuell lukking.
I motsetning til konvensjonelle biler anbefaler Tesla å trykke forsiktig ned på spesifikke punkter nær pansermerket for å unngå å skade aluminiumpanelet på panseret. For førere som ikke er kjent med denne prosessen, kan det føles uvant — og passasjerer kan noen ganger ved et uhell smelle panseret igjen.
På grunn av dette velger mange Tesla-eiere å installere et soft close frunk-system, som lar frunken lukke seg automatisk med minimal kraft.
I denne trinnvise guiden forklarer vi hvordan du installerer en Tesla soft close frunk for Model 3 og Model Y, hvilke verktøy du trenger, og hvordan oppgraderingen forbedrer den daglige bruken.

Installasjonsvideoer
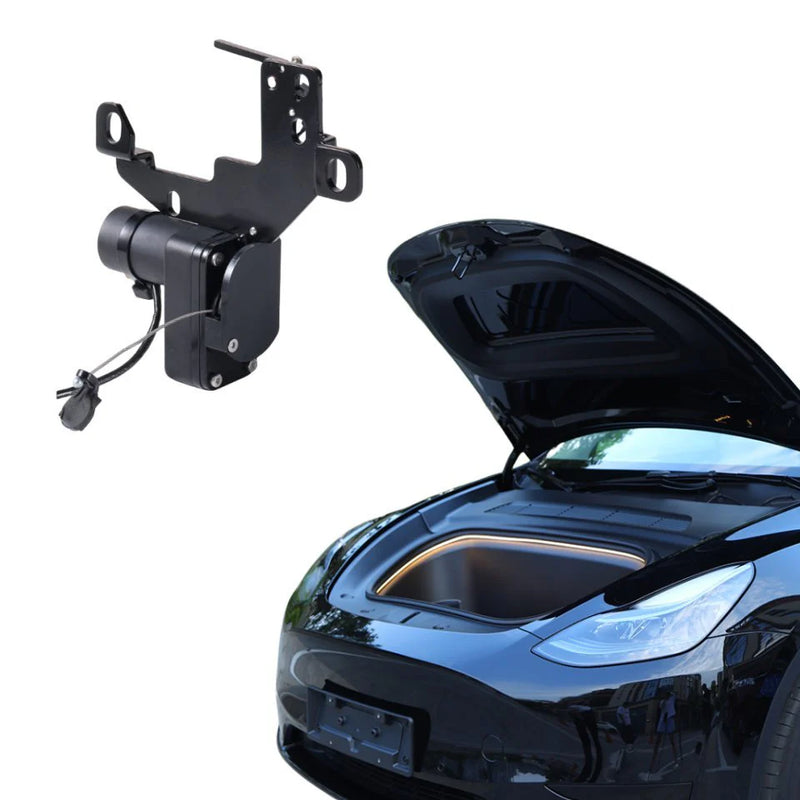
Hva er en Tesla soft close frunk?
En Tesla soft close frunk er en ettermarkedsoppgradering som erstatter den standard frunk-låsen med en motorisert låsemekanisme.
I stedet for å trykke hardt på panseret for å lukke det, senker føreren frunken forsiktig. Når panseret når låseposisjonen, oppdager mekanismen det og drar automatisk panseret ned til det låses sikkert.
Denne teknologien ligner på soft-close dører og bagasjerom som finnes i luksusbiler. Et eksempel på denne typen oppgradering er Grundig Tesla Soft Close Lock, som er spesielt designet for Tesla-biler og integreres med det eksisterende frunk-systemet. Resultatet er en jevnere og mer raffinert lukkeopplevelse som reduserer risikoen for å skade panseret.
Hvorfor installere en soft close frunk?
Før vi går i gang med installasjonsprosessen, er det nyttig å forstå hvorfor mange Tesla-eiere mener denne oppgraderingen er verdt det.
Enklere lukking av frunk
I stedet for å påføre trykk på hetten, fullfører systemet lukkeprosessen automatisk.
Redusert risiko for skade på hetten
Tesla-hetter er laget av lett aluminium. Å fjerne behovet for manuelt trykk bidrar til å redusere risikoen for bulker eller panelbøyning.
En mer premium opplevelse
Soft-close-teknologi er vanlig i luksusbiler og gir et raffinert preg til Teslas design.
Mer praktisk daglig bruk
Mange sjåfører rapporterer at de bruker frunken oftere når lukking blir enklere.
Grundig Power Frunk
Soft Close-lås
- Magnetisk automatisk tetning fra 5 mm — ingen skyving nødvendig
- Under 50 dB — stille drift
- Plug-and-play ledningsnett — ingen boring eller kutting
- ~15 minutters montering
- Kompatibel med berøringsskjerm, app og nøkkelkontroller
$135 Gratis frakt
Verktøy du trenger
Før du begynner monteringen, samle noen grunnleggende verktøy. De fleste Tesla soft close frunk-sett krever kun enkelt utstyr:
- Pipesett
- Skrutrekker
- Verktøy for å fjerne kledning
- Ren klut eller håndkle
- Lommelykt (valgfritt)
Siden mange moderne sett er plug-and-play, kreves vanligvis ikke ledningskutting eller boring.
Forberedelse før montering
Før du starter monteringsprosessen, bruk noen minutter på å forberede kjøretøyet ditt.
Parker trygt
Sørg for at kjøretøyet står på et flatt underlag med parkeringsbremsen aktivert.
Slå av kjøretøyet
Selv om monteringen ikke involverer høyspenningskomponenter, er det alltid lurt å slå av kjøretøysystemene.
Åpne frunken helt
Hev frunk-hette helt opp og sørg for at den er stabil mens du arbeider.
Beskytt lakken
Legg en myk klut rundt låseområdet for å unngå utilsiktede riper.
Når alt er klart, kan du begynne monteringen.
Trinnvis monteringsveiledning
Fjern frunk-kledningspanelet
Start med å få tilgang til låseområdet inne i frunken. Den indre frunk-kledningspanelet er festet med flere klips. Bruk et verktøy for å fjerne kledning, og løft forsiktig opp panelet for å frigjøre klipsene. Ta deg god tid og unngå å dra for hardt, da klipsene kan sitte stramt. Når panelet er fjernet, legg det til side — dette trinnet eksponerer den fabrikkmonterte frunk-låsemekanismen.
Finn den originale frunk-låsen
Med listen fjernet vil du se den originale låsen montert nær frontkanten av frunken. Låsen er vanligvis festet med noen bolter og koblet til et ledningsnett. Før du fjerner den, ta et øyeblikk for å observere hvordan den er plassert og koblet — dette vil gjøre det enklere å montere erstatningsenheten.
Fjern den originale frunk-låsen
Bruk en pipenøkkel for å fjerne boltene som holder den originale låsen. Når boltene er fjernet:
- Løft forsiktig låsemonteringen.
- Koble fra ledningsnettet.
- Legg den originale låsen til side.
Pass på å beholde boltene, da de kan brukes igjen under installasjonen.
Installer soft close-låsemekanismen
Plasser den nye låsen — som for eksempel Grundig Power Frunk Soft Close Lock — på samme sted som den originale låsen var montert. Juster monteringshullene og fest enheten med de originale boltene. Stram godt, men unngå å overstramme. Når den er festet, sørg for at låsen sitter jevnt og riktig justert.
Koble til ledningsnettet
De fleste soft close-frunk-systemer bruker en plug-and-play ledningsnett. Koble enkelt den medfølgende ledningen til bilens eksisterende kontakt. Sørg for at forbindelsen er sikker og at ledningene er pent ført langs eksisterende kabelstier. Unngå å plassere ledninger nær bevegelige deler eller skarpe kanter — noen sett inkluderer kabelklips for å holde ledningene ryddige.
Test soft close-funksjonen
Før du monterer listpanelet på nytt, test systemet. Senk forsiktig frunk-lokket til det når låsen — hvis installasjonen var vellykket, vil mekanismen oppdage lokket og automatisk trekke det ned til det låses sikkert. Åpne frunken ved hjelp av bilens berøringsskjerm eller mobilapp og gjenta noen ganger for å bekrefte jevn funksjon. Hvis låsen ikke aktiveres, sjekk ledningsforbindelsene på nytt.
Monter frunk-listpanelet på nytt
Når du har bekreftet at alt fungerer som det skal, monter interiørlistepanelet på nytt. Juster klipsene med deres opprinnelige posisjoner og trykk panelet fast til hver klips klikker på plass. Sørg for at listen sitter jevnt og sikkert. Installeringen er nå fullført.
Tips for en jevn installasjon
Arbeid sakte
Ta deg god tid når du fjerner listklips for å unngå å brekke dem.
Sjekk justeringen
Hvis låsen ikke lukker jevnt, juster posisjonen litt før du strammer boltene.
Hold ledningene organiserte
Sikre løse ledninger slik at de ikke kommer i veien for bevegelige deler.
Test før montering
Test alltid systemet før du monterer på plass listene igjen.
Flere ideer til frunk-oppgraderinger
Når du har installert et soft close-frunksystem, kan du vurdere andre oppgraderinger som forbedrer frunkens brukervennlighet. En populær tillegg er forbedret belysning.
Grundig Frunk LED Light Strip gir sterk LED-belysning over hele frunkrommet, noe som gjør det enklere å finne ting i svakt lys som under nattlige handleturer, parkeringshus, bilturer og ladestopp.
Vanlige spørsmål om installasjon av soft close-frunk
Påvirker installasjon av soft close-frunk Tesla-kontrollene?
Nei. Frunken kan fortsatt åpnes via berøringsskjermen, mobilappen eller nøkkelkontroller. Oppgraderingen endrer bare hvordan frunken lukkes.
Tømmer systemet bilbatteriet?
Soft-close-systemer trekker bare strøm kortvarig under lukkeoperasjonen, så batteripåvirkningen er minimal.
Er denne oppgraderingen reversibel?
Ja. De fleste soft close-sett kan fjernes og erstattes med den originale låsen om nødvendig, uten permanente endringer på kjøretøyet.
Avsluttende tanker
Tesla-kjøretøy er designet med innovasjon og enkelhet i tankene, men små oppgraderinger kan gjøre eierskapsopplevelsen enda bedre. Å installere et soft close-frunksystem er en av de enkleste måtene å forbedre bekvemmeligheten for sjåfører av Tesla Model 3 og Model Y.
Ved å erstatte standardlåsen med en motorisert mekanisme kan sjåfører lukke frunken uten anstrengelse samtidig som trykket på aluminiumshetten reduseres. Kombinert med forbedret frunk-belysning blir plassen enda mer praktisk for daglig bruk.
Med bare noen få verktøy og omtrent en halv times installasjonstid kan Tesla-eiere legge til en funksjon som gir bekvemmelighet, beskyttelse og en mer premium følelse til kjøretøyet sitt.
Klar til å installere? Kjøp Grundig Soft Close Lock. Model 3 · Model Y · Model S · Model X · Gratis frakt · ~15 min installasjon
Handle nå — 135 $ →