

A tandem dually trailer is a lot of moving parts to trust to a quick glance before you pull away. Ten, twelve, or more tires. A brake system. A load that can shift. The difference between a safe trip and a roadside disaster usually comes down to a pre-trip checklist done properly — and the two things most people skip, the tire pressures and the rear visibility, are exactly the two that cause the most trouble.
This guide walks through a complete pre-trip routine in order of importance, then gives you a printable-style checklist you can run down every time you hook up. We make the TPMS and camera we recommend, so we will point you to the gear that turns the two hardest checks into something you glance at on a screen.
Why a Pre-Trip Checklist Matters for Tandem Dually Trailers
A tandem dually trailer has more tires, more brakes, and more load than a simple utility trailer, which means more ways for a small problem to become a big one at speed. The point of a checklist is not that you are thorough — it is that you are consistent. You check the same things in the same order every time, so nothing gets skipped because you were in a hurry or because the sun was in your eyes.
Professional drivers do this for a reason: it catches the flat spare, the loose pin, the low tire, and the unplugged brake controller before the highway catches them for you. For a tandem dually, the two checks that matter most are the ones that are hardest to see — the tire pressures on every wheel, and the blind zone behind the trailer.
What does skipping the checklist actually cost? A blown trailer tire at highway speed is rarely just a tire — it takes out the rim, the fender, and often the brake lines or wiring on that corner, and it strands you fully loaded. A loose coupler or a forgotten breakaway can be far worse. The ten minutes this checklist takes is the cheapest insurance you will buy all year, and unlike most insurance, it prevents the problem instead of paying for it afterward.
Step 1 — Tires First: Pressure, Tread, Load Range
Everything starts with the tires, because a tire failure is the most common and most dangerous incident you will face. Walk the entire combination and check pressure, tread, and sidewall condition on every single tire — including the inner duals and the spare.
- Pressure: every tire at its cold PSI from the sidewall. Check cold, before the trailer has moved.
- Tread: look for uneven wear, which often signals an alignment or load problem, and replace any tire near its wear bars.
- Sidewalls: cracks, bulges, or cuts mean the tire is done, regardless of tread depth.
- Load range: confirm the tires are rated for the load you are carrying, not just the size that fits.
Step 2 — Set Up Your TPMS Before You Roll
A manual pressure check is a snapshot at the start of the trip. A TPMS is what protects you for the next six hundred miles. Before departure, confirm every sensor is reporting to the display, your high and low pressure thresholds are set to the right numbers, and the temperature alarm is on. Then you can drive knowing a slow leak or a heating tire will announce itself instead of waiting for the walkaround you never do at mile 300.
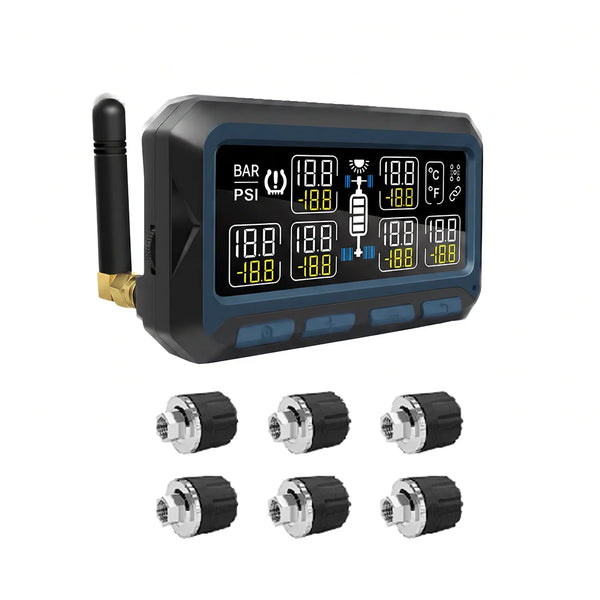
GRUNDIG 550S Solar TPMS — Every Tire, Every Mile
6–36 wheels, 200 PSI, solar + Type-C. Confirms every tire is reporting before you leave and alerts on pressure, temperature, and fast leaks the whole way.
View the 550S Solar TPMS →Step 3 — Camera & Visibility Check
Backing a tandem dually trailer is where the dents happen. Before you leave, confirm your backup camera is mounted, aimed, and showing a clear picture on the monitor — and that the lens is clean. A camera that is out of position or covered in road grime is almost as bad as no camera at all, and the fix takes ten seconds at the start of the trip rather than a frustrating minute mid-parking-lot. Make it part of the walkaround, the same way you check the lights.

GRUNDIG Solar Wireless Backup Camera — See Behind You
Magnetic, solar, wire-free. A full-color rear view on a 7-inch monitor, so the blind zone behind the trailer is gone before you back up.
View the Backup Camera →Step 4 — Brakes, Breakaway & Lights
The electrical and brake systems are the second half of a safe trailer. Confirm the brake controller is set to the right gain for your load, test the breakaway switch and its battery, and check the trailer brakes actually engage. Then walk the lights: running lights, brake lights, and turn signals on both sides. A dead brake light on a tandem trailer is invisible to you and dangerous to everyone behind you.
The breakaway deserves a special mention because it is the safety you only use in an emergency — which means you never practice it until it matters. Pull the pin and confirm the trailer brakes lock, then reset it. It takes twenty seconds and confirms the one system that saves the trailer if it ever separates from the truck. And remember to cross the safety chains under the tongue, so they cradle the trailer if the coupler fails rather than letting the tongue drop onto the road.
Step 5 — Load & Weight Distribution (60/40 + Tongue Weight)
The last check is the load. Roughly 60% of the weight ahead of the axle, 40% behind, with 10–15% tongue weight. A rear-heavy trailer sways; a front-heavy trailer unloads your steering. Confirm the load cannot shift, the tie-downs are tight, and the heaviest items are low and forward. This is the check that turns a stable trailer into a predictable one.
After the first ten miles, stop and re-check the straps — loads settle and straps stretch in the first few miles, and a strap that was tight in the driveway may be loose once the trailer has bounced over its first set of bumps. It is the same discipline as the pre-trip check, just applied once more while everything is still easy to reach.
Seasonal & Weather Adjustments to Your Routine
The same checklist works year-round, but a few items deserve extra attention when the weather turns. In cold weather, tire pressure drops roughly 1 PSI for every 10°F, so a trailer that was correct in autumn is several PSI low on a winter morning — re-check and re-set pressures when the season changes. In hot weather, the opposite risk applies: a tire that is even slightly underinflated heats up faster, so the TPMS temperature readout becomes the most important number on the dash.
Rain changes the priorities too. Tread depth matters most on wet roads, and a trailer that hydroplanes is one with worn tires. Snow and ice add the same concern plus the need to confirm the brake controller and breakaway are in top condition, since a trailer brake failure on a slick downhill is exactly the scenario you cannot afford. Adjust what you emphasize, but never skip the core checks — pressure, tires, TPMS, camera, brakes, load.
The Full Pre-Trip Checklist (Check Each Box)
Run down this list before every tow. Tap a box to mark it done.
Inspection Zone → What to Check → What to Fix
| Zone | What to check | What to fix |
|---|---|---|
| Tires | Pressure, tread, sidewalls, load range | Inflate to cold PSI, replace worn/damaged |
| TPMS | Sensors reporting, thresholds set | Re-pair sensors, adjust thresholds |
| Camera | Picture, angle, lens | Reposition, wipe the lens |
| Brakes | Controller gain, breakaway | Adjust gain, test the breakaway |
| Lights | Running, brake, signals | Replace bulbs, fix wiring |
| Load | 60/40, tongue weight, tie-downs | Rebalance, re-secure |
Frequently Asked Questions
How long should a pre-trip inspection take?
Do I really need to check the inner duals every trip?
What is the most skipped pre-trip check?
Can a TPMS replace a manual tire check?
What should I do if something on the checklist is wrong?
Should I do a full walkaround at fuel stops too?
How do I set my TPMS thresholds for a pre-trip?
Do I need a backup camera if I already check my mirrors?
How often should I run the full checklist?
What tools should I keep on board for tire issues?
Make the Two Hardest Checks the Easiest
A TPMS watches every tire and a wire-free camera shows the blind zone — so your pre-trip check is done on a screen, not on your knees.
Shop TPMS Systems →Free shipping · Trusted German Heritage since 1945