

Tesla vehicles are known for their cutting-edge technology, minimalist design, and innovative electric powertrains. Owners of the Tesla Model 3 and Tesla Model Y enjoy a driving experience that feels far more advanced than most traditional cars.
However, one small detail often surprises new Tesla owners: the front trunk (frunk) requires careful manual closing.
Unlike conventional vehicles, Tesla recommends pressing down gently on specific points near the hood badge to avoid damaging the aluminum hood panel. For drivers unfamiliar with this process, it can feel awkward — and passengers sometimes accidentally slam the hood shut.
Because of this, many Tesla owners choose to install a soft close frunk system, which allows the frunk to close automatically with minimal force.
In this step-by-step guide, we'll explain how to install a Tesla soft close frunk for Model 3 and Model Y, what tools you'll need, and how the upgrade improves everyday usability.

Installation Videos
What Is a Tesla Soft Close Frunk?
A Tesla soft close frunk is an aftermarket upgrade that replaces the standard frunk latch with a motorized locking mechanism.
Instead of pressing firmly on the hood to close it, the driver simply lowers the frunk gently. Once the hood reaches the latch position, the mechanism detects it and automatically pulls the hood down until it locks securely.
This technology is similar to the soft-close doors and trunks found in luxury vehicles. One example of this type of upgrade is the Grundig Tesla Soft Close Lock, which is designed specifically for Tesla vehicles and integrates with the existing frunk system. The result is a smoother and more refined closing experience that reduces the risk of damaging the hood.
Why Install a Soft Close Frunk?
Before diving into the installation process, it's helpful to understand why many Tesla owners consider this upgrade worthwhile.
Easier Frunk Closing
Instead of applying pressure to the hood, the system finishes the closing process automatically.
Reduced Risk of Hood Damage
Tesla hoods are made from lightweight aluminum. Removing the need for manual pressure helps reduce the risk of dents or panel flex.
A More Premium Experience
Soft-close technology is common in high-end vehicles and adds a refined touch to Tesla's design.
More Convenient Daily Use
Many drivers report that they use their frunk more often once closing it becomes easier.
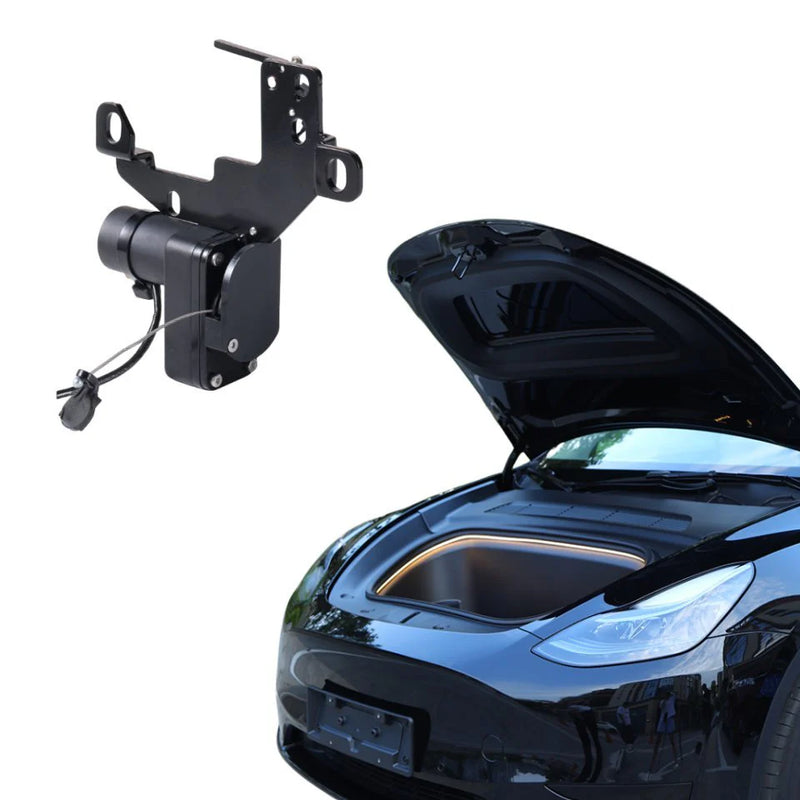
Grundig Power Frunk
Soft Close Lock
- Magnetic auto-seal from 5 mm — no push needed
- Under 50 dB — silent operation
- Plug-and-play harness — no drilling or cutting
- ~15-minute installation
- Compatible with touchscreen, app & key controls
$135 Free shipping
Tools You'll Need
Before beginning installation, gather a few basic tools. Most Tesla soft close frunk kits require only simple equipment:
- Socket wrench set
- Screwdriver
- Trim removal tool
- Clean cloth or towel
- Flashlight (optional)
Because many modern kits are plug-and-play, no wire cutting or drilling is typically required.
Preparation Before Installation
Before starting the installation process, take a few minutes to prepare your vehicle.
Park Safely
Make sure the vehicle is parked on a flat surface with the parking brake engaged.
Power Down the Vehicle
Although the installation does not involve high-voltage components, it's always a good idea to turn off the vehicle systems.
Fully Open the Frunk
Raise the frunk hood completely and ensure it is stable while you work.
Protect the Paint
Place a soft cloth around the latch area to avoid accidental scratches.
Once everything is prepared, you can begin the installation.
Step-by-Step Installation Guide
Remove the Frunk Trim Panel
Start by accessing the latch area inside the frunk. The interior frunk trim panel is secured with several clips. Using a trim removal tool, gently pry up the panel to release the clips. Take your time and avoid pulling too aggressively, as the clips can be tight. Once removed, set the trim panel aside — this step exposes the factory frunk latch mechanism.
Locate the Factory Frunk Latch
With the trim removed, you'll see the factory latch mounted near the front edge of the frunk. The latch is typically secured with a few bolts and connected to a wiring harness. Before removing it, take a moment to observe how it is positioned and connected — this will make installing the replacement unit easier.
Remove the Original Frunk Lock
Using a socket wrench, remove the bolts that secure the factory latch. Once the bolts are removed:
- Carefully lift the latch assembly.
- Disconnect the wiring harness.
- Set the original latch aside.
Be sure to keep the bolts, as they may be reused during installation.
Install the Soft Close Lock Mechanism
Position the new latch — such as the Grundig Power Frunk Soft Close Lock — in the same location where the factory latch was installed. Align the mounting holes and secure the unit using the original bolts. Tighten firmly but avoid over-tightening. Once secured, ensure the latch sits flush and properly aligned.
Connect the Wiring Harness
Most soft close frunk systems use a plug-and-play wiring harness. Simply connect the provided harness to the vehicle's existing connector. Make sure the connection is secure and that the wiring is routed neatly along existing cable paths. Avoid placing wires near moving components or sharp edges — some kits include cable clips to keep the wiring tidy.
Test the Soft Close Function
Before reinstalling the trim panel, test the system. Gently lower the frunk hood until it reaches the latch — if installation was successful, the mechanism will detect the hood and automatically pull it down until it locks securely. Open the frunk using the vehicle's touchscreen or mobile app and repeat a few times to confirm smooth operation. If the latch doesn't activate, double-check the wiring connections.
Reinstall the Frunk Trim Panel
Once you've confirmed everything is working correctly, reinstall the interior trim panel. Align the clips with their original positions and press the panel down firmly until each clip snaps into place. Make sure the trim sits evenly and securely. Your installation is now complete.
Tips for a Smooth Installation
Work Slowly
Take your time when removing trim clips to avoid breaking them.
Check Alignment
If the latch doesn't close smoothly, adjust its position slightly before tightening the bolts.
Keep Wiring Organized
Secure loose wires so they don't interfere with moving parts.
Test Before Reassembly
Always test the system before reinstalling trim panels.
Additional Frunk Upgrade Ideas
Once you've installed a soft close frunk system, you may want to consider other upgrades that improve the frunk's usability. One popular addition is improved lighting.
The Grundig Frunk LED Light Strip adds bright LED illumination across the entire frunk compartment, making it easier to find items in low-light conditions such as nighttime grocery runs, parking garages, road trips, and charging stops.
Common Questions About Soft Close Frunk Installation
Does installing a soft close frunk affect Tesla controls?
No. The frunk can still be opened using the touchscreen, mobile app, or key controls. The upgrade only changes how the frunk closes.
Does the system drain the vehicle battery?
Soft-close systems only draw power briefly during the closing operation, so battery impact is minimal.
Is this upgrade reversible?
Yes. Most soft close kits can be removed and replaced with the original latch if necessary, with no permanent changes to the vehicle.
Final Thoughts
Tesla vehicles are designed with innovation and simplicity in mind, but small upgrades can make the ownership experience even better. Installing a soft close frunk system is one of the easiest ways to improve convenience for drivers of the Tesla Model 3 and Model Y.
By replacing the standard latch with a motorized mechanism, drivers can close the frunk effortlessly while reducing pressure on the aluminum hood. Pairing this with improved frunk lighting makes the space even more practical for everyday use.
With just a few tools and about half an hour of installation time, Tesla owners can add a feature that brings convenience, protection, and a more premium feel to their vehicle.
Ready to install? Shop the Grundig Soft Close Lock. Model 3 · Model Y · Model S · Model X · Free shipping · ~15 min install
Shop Now — $135 →